Tutorials!
+2
Zero
Dr_Maniacal
6 posters
Page 1 of 1
 Tutorials!
Alright, so a few people have been asking me how the custom shapes in my new style work (Zeph XD), so instead of explaining it over and over again, I'm starting a thread devoted soley to tutorials. First up:
Step 1:
In step 1, all you need to do is make a single transparent layer, get a few interesting, hard-edged vector brushes you may have, and create a shape with them in black. Once you have the shape you want, got to edit -> define brush preset to make the shape into a custom brush. You may then find the custom brush in the brush selection window. It will be the very last brush. Your screen should look something like this:
https://2img.net/h/i148.photobucket.com/albums/s30/Dr_Maniacal/Tutorial%20pics/Layermasktut1.png
Step 2:
Now that you have your custom shape in the form of a brush, I recommend you either turn off the shape's layer, or just delete it. Once you've done that, make a new layer, select it in the layer pallete, and group it. (Layer -> group layer) Here's what your screen should look like while grouping:
https://2img.net/h/i148.photobucket.com/albums/s30/Dr_Maniacal/Tutorial%20pics/LayerMasktut2.png
(Also, ignore the long, vertical window behind everything)
Step 3:
Now, once you group, your layer pallete will look like this:
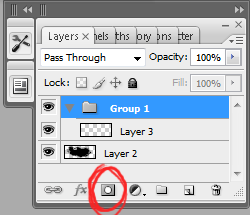
See the circled button? Click that while you have the group layer selected to create a layer mask for that layer. It will make a white box appear beside the group layer's folder icon, like so:
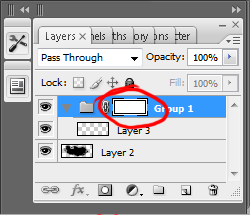
That's your layer mask.
Step 4:
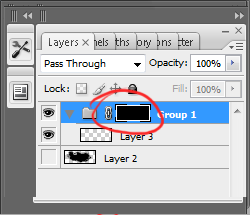
Now, the white in that box represents the part of the mask that you can see through. Right now, the whole thing is white, so everything below it is going to show through. Click on the white box, then go get the fill bucket, choose black as the color, and fill the canvas with black. Nothing is going to happen to the canvas itself, but, providing you have the layer mask selected, the mask icon will turn black as you can see here:
Step 5:
So now that the whole mask is black, nothing underneath it will show through to the top. This is where that custom brush we made earlier comes in. Go select it in your brush menu, choose white as the primary color, make sure the mask is selected again, and just brush your shape wherever you want it on the canvas. Once again, nothing visible will happen on the canvas itself, but you will see the shape appear on the layer mask.
https://2img.net/h/i148.photobucket.com/albums/s30/Dr_Maniacal/Tutorial%20pics/LayerMasktut6.png
Step 6:
Now, that you have the mask set up, you can start making the sig itself. Make sure you place all layers you want inside the shape of the sig underneath the masked group layer, and anything you want outside the shape (like text) above the group.
https://2img.net/h/i148.photobucket.com/albums/s30/Dr_Maniacal/Tutorial%20pics/LayerMasktut7.png
And now you're pretty much set to go. Easy, eh?
----------------------------------------------------------------------------------------------
Now then, if anyone wants a tutorial on anything else you've seen me do in a sig, you can request them here. I'll try to make one for you, as much of a hassle as it is. Anyways if anyone's got questions or anything, feel free to ask. (But please, don't ask me to link to brushsets and stock images you may have seen me using in this tutorial, or any others I make in the future. You guys are big kids, and I know you can find your own resources. Don't be lazy. )
)
Using Layer Masks to Create Custom signature shapes:
Step 1:
In step 1, all you need to do is make a single transparent layer, get a few interesting, hard-edged vector brushes you may have, and create a shape with them in black. Once you have the shape you want, got to edit -> define brush preset to make the shape into a custom brush. You may then find the custom brush in the brush selection window. It will be the very last brush. Your screen should look something like this:
https://2img.net/h/i148.photobucket.com/albums/s30/Dr_Maniacal/Tutorial%20pics/Layermasktut1.png
Step 2:
Now that you have your custom shape in the form of a brush, I recommend you either turn off the shape's layer, or just delete it. Once you've done that, make a new layer, select it in the layer pallete, and group it. (Layer -> group layer) Here's what your screen should look like while grouping:
https://2img.net/h/i148.photobucket.com/albums/s30/Dr_Maniacal/Tutorial%20pics/LayerMasktut2.png
(Also, ignore the long, vertical window behind everything)
Step 3:
Now, once you group, your layer pallete will look like this:

See the circled button? Click that while you have the group layer selected to create a layer mask for that layer. It will make a white box appear beside the group layer's folder icon, like so:

That's your layer mask.
Step 4:
Now, the white in that box represents the part of the mask that you can see through. Right now, the whole thing is white, so everything below it is going to show through. Click on the white box, then go get the fill bucket, choose black as the color, and fill the canvas with black. Nothing is going to happen to the canvas itself, but, providing you have the layer mask selected, the mask icon will turn black as you can see here:

Step 5:
So now that the whole mask is black, nothing underneath it will show through to the top. This is where that custom brush we made earlier comes in. Go select it in your brush menu, choose white as the primary color, make sure the mask is selected again, and just brush your shape wherever you want it on the canvas. Once again, nothing visible will happen on the canvas itself, but you will see the shape appear on the layer mask.
https://2img.net/h/i148.photobucket.com/albums/s30/Dr_Maniacal/Tutorial%20pics/LayerMasktut6.png
Step 6:
Now, that you have the mask set up, you can start making the sig itself. Make sure you place all layers you want inside the shape of the sig underneath the masked group layer, and anything you want outside the shape (like text) above the group.
https://2img.net/h/i148.photobucket.com/albums/s30/Dr_Maniacal/Tutorial%20pics/LayerMasktut7.png
And now you're pretty much set to go. Easy, eh?
----------------------------------------------------------------------------------------------
Now then, if anyone wants a tutorial on anything else you've seen me do in a sig, you can request them here. I'll try to make one for you, as much of a hassle as it is. Anyways if anyone's got questions or anything, feel free to ask. (But please, don't ask me to link to brushsets and stock images you may have seen me using in this tutorial, or any others I make in the future. You guys are big kids, and I know you can find your own resources. Don't be lazy.

Dr_Maniacal- Events Team

- Number of posts : 212
Age : 33
Brawl: : 1848-1746-3721
Smash Points/Trophies
Smash Points: 0 -

 Re: Tutorials!
wow nice tutorial, i'll do that someday.

Zero- Global Moderator

- Number of posts : 1244
Age : 31
Brawl: : 0989-1985-9880
Smash Points/Trophies
Smash Points: 0 -

 Re: Tutorials!
I'll do it right now ^_^
...or after school. Q.Q
Thanks Doc. Verrrrrrrrry helpful.
...or after school. Q.Q
Thanks Doc. Verrrrrrrrry helpful.

Zephron©- PK Knight

- Number of posts : 1615
Age : 31
Brawl: : 1934-2362-2797
Smash Points/Trophies
Smash Points: 75
 Re: Tutorials!
So basically the background stuff is a bunch of diff: brushes, stock images and random drawing layered on top of eachother?

petrovich112- Signature Artist
- Number of posts : 357
Age : 32
Smash Points/Trophies
Smash Points: 20
 Re: Tutorials!
Basically. But, you have to know the program well enough to know what blending modes to use when, what stock would combine to get the effect you're looking for, and how to combine brushes, stock and the like tastefully. Anyone can make a bunch of layers with stuff on them and set them to overlay (which usually looks awful btw), you need to use a number of techniques and combinations to get great effects.

Dr_Maniacal- Events Team

- Number of posts : 212
Age : 33
Brawl: : 1848-1746-3721
Smash Points/Trophies
Smash Points: 0 -

 Re: Tutorials!
Umm Last thing how do you get these to not rquire a matte for the background. i ask because i know my sigs matte is white on photobucket and grey here and also i cant guess the grey thats here correctly

petrovich112- Signature Artist
- Number of posts : 357
Age : 32
Smash Points/Trophies
Smash Points: 20
 Re: Tutorials!
Just get an application that lets you grab stuff off of the screen. It'll let you get the same color of anything. Or just make the background transparent, if you can get it to work.

Zephron©- PK Knight

- Number of posts : 1615
Age : 31
Brawl: : 1934-2362-2797
Smash Points/Trophies
Smash Points: 75
 Re: Tutorials!
Er.....I have a huge favor teh ask.....
but could u make me a mario sig? Just so......I dunno. I wanna see a badass mario sig?
lol, j/k. More like.....an example?
Cuz i'm totally getting the program......*later in life, but ya*
Oh and before I forget, great tutorial! Although i can't exactly check it out, i have an idea about what i want to do.
but could u make me a mario sig? Just so......I dunno. I wanna see a badass mario sig?

lol, j/k. More like.....an example?
Cuz i'm totally getting the program......*later in life, but ya*
Oh and before I forget, great tutorial! Although i can't exactly check it out, i have an idea about what i want to do.

57r!k3r- Smash Seeker
- Number of posts : 69
Age : 33
Brawl: : 1160-9397-1306
Smash Points/Trophies
Smash Points: 0
 Re: Tutorials!
Well, I'd personally love to make you one. PM me the stuff you want in it.
Follow this form:
Sig Size (If you aren't sure about the size you want, we'll make it at 475x150.):
Picture(s): (link)
Text:
Secondary Text:
Font:
Color Scheme:
I can animate, but please keep it small or nonexistant.
Yes, I did copy paste it from Doc's sigshop. It's a good form! And a good shop, but that's besides the point.
Of course, this is Doc's Tut page so he can do it if he wants. I just havent made anything in awhile. Or if you want, for that matter.

Zephron©- PK Knight

- Number of posts : 1615
Age : 31
Brawl: : 1934-2362-2797
Smash Points/Trophies
Smash Points: 75
 Re: Tutorials!
...hehe im gona be a retard and say...how do u open up photoshop cuz i draged the thing to bit commet and it downloaded and it wont let me open so can some 1 tell me wat i did wrong been tryin to figure this out for a while

HanZo- Smash Explorer
- Number of posts : 551
Age : 31
Brawl: : 0559-6435-4878
Smash Points/Trophies
Smash Points: 0
 Re: Tutorials!
You gave us like no information Hanzo.. you dragged the thing to bit commet and wont open... Okay...???

Zephron©- PK Knight

- Number of posts : 1615
Age : 31
Brawl: : 1934-2362-2797
Smash Points/Trophies
Smash Points: 75
 Re: Tutorials!
well then nothing happened...no menu no layers or stuff, nothing came up i tried it all the time and still gettin the results to be the same...

HanZo- Smash Explorer
- Number of posts : 551
Age : 31
Brawl: : 0559-6435-4878
Smash Points/Trophies
Smash Points: 0
 Re: Tutorials!
You clearly were trying to download it from some illegal (:O!!) site, and I really cant help you there. It was a bad site, end of story. Buy it legally, and not have these problems.

Zephron©- PK Knight

- Number of posts : 1615
Age : 31
Brawl: : 1934-2362-2797
Smash Points/Trophies
Smash Points: 75
 Re: Tutorials!
whoops, didn't see this.Zephron© wrote:Well, I'd personally love to make you one. PM me the stuff you want in it.
Follow this form:
Sig Size (If you aren't sure about the size you want, we'll make it at 475x150.):
Picture(s): (link)
Text:
Secondary Text:
Font:
Color Scheme:
I can animate, but please keep it small or nonexistant.
Yes, I did copy paste it from Doc's sigshop. It's a good form! And a good shop, but that's besides the point.
Of course, this is Doc's Tut page so he can do it if he wants. I just havent made anything in awhile. Or if you want, for that matter.
anyway, i'm not picky. do whatever u please.

57r!k3r- Smash Seeker
- Number of posts : 69
Age : 33
Brawl: : 1160-9397-1306
Smash Points/Trophies
Smash Points: 0
 Re: Tutorials!
Uhm... not trying to be mean, but please, fill it out. It makes our job 10x easier.

Zephron©- PK Knight

- Number of posts : 1615
Age : 31
Brawl: : 1934-2362-2797
Smash Points/Trophies
Smash Points: 75
 Re: Tutorials!
kay umm everytime i make a new brush in adobe it ends up grey wtf am i doin wrong

petrovich112- Signature Artist
- Number of posts : 357
Age : 32
Smash Points/Trophies
Smash Points: 20
 Re: Tutorials!
Oh no, it always uses gray/black. The point was to make the shape of it, right? If you want the same colors and crap just copy paste. If you want a part to be a lighter color use transparency.
Just change the color if none of those problems besides the black is the problem.
Just change the color if none of those problems besides the black is the problem.

Zephron©- PK Knight

- Number of posts : 1615
Age : 31
Brawl: : 1934-2362-2797
Smash Points/Trophies
Smash Points: 75
 Re: Tutorials!
hmm thats aggravating. That marks up one point for gimp. at 0 points for photoshop atm ill see what my final tally is though

petrovich112- Signature Artist
- Number of posts : 357
Age : 32
Smash Points/Trophies
Smash Points: 20
Page 1 of 1
Permissions in this forum:
You cannot reply to topics in this forum

